How to Calculate Your Inverter/UPS Battery Backup Time in hindi. Calculate Battery Backup Time

दिसंबर 30, 2019
इस पोस्ट को पढने के बाद आपको पता लग जाएगा की किस प्रकार से हम अपनी Inverter या UPS की battery का backup time निकाल सकते हैं | इस पोस्ट में हम आपको दो तरीके बताएँगे जो भी तरीका आपको पसंद आए आप उस तरीके को  battery का backup time निकलने के लिए इस्तेमाल कर सकते हैं , तो चलिए सुरू करते है:-

Calculate Battery Backup Time.

किसी भी battery का backup time निकालने के लिए हम  कुछ बातें पहले से पता होनी चाहिए जैसे की, हम battery पर कुल  कितना load (watt) connect करने वाले हैं  ? battery voltage कितना है ? battery कितने Ah की है ? और battery की कितनी क्षमता (Efficiency) इस्तेमाल करनी है ? 

battery voltage, battery Ah और battery efficiency तो हमको battery से मिल जाएगी, लेकिन load हमको कैलकुलेट करना पड़ेगा जिसको हम battery voltage से inverter की मदद से चलाने वाले है ? माना की हमारे घर का load 1000 watt है जोकि हम inverter से connect करने वाले है| battery backup निकालने का फार्मूला होगा:-

h = battery Ah * battery voltage * number of battery * efficiency / total load 

माना 
Battery Ah :- 120 Ah
Battery Voltage :- 12V
Number of Battery :- 1 
Efficiency :- 80%    (0.8) (किसी भी battery को 80% ही इस्तेमाल किया जाता है)
Total load :- 1000 watt

इस प्रकार battery backup time होगा :-

= 120*12*1*0.8 / 1000 h
= 1152 / 1000 h
= 1.15h
1000 watt के load पर 120 Ah की battery 1.15h का backup देगी| चलिए अब दुसरे तरीके से निकालते है :-
Total load :- 1000 Watt
Battery voltage :- 12V
Efficiency :- 80%    (0.8)
Discharge Current :- Total Load/battery voltage
Discharge Current = 1000 watt/12V = 83.33A

Battery Backup Time निकालने का formula होगा :-

h = Battery Ah * Efficiency / Discharge Current

इस प्रकार battery backup होगा :-

= 120 * 0.8 / 83.33 h 
= 96 / 83.33 h 
= 1.15 h 
1000 watt के load पर 120 Ah की battery 1.15h का backup देगी|
तो देखिए इस प्रकार से हम दोनों तरीको को इस्तेमाल करके battery का backup निकाल सकते हैं, दोनों ही formula इस्तेमाल करने पर हमारा backup time एक ही आया तो आप आपनी  सुविधानुसार कोइ भी तरीका इस्तेमाल कर सकते हैं  |

आपको ये पोस्ट कैसी लगी हमको नीचे comment करके जरुर बताए और आप इस topic को विडियो के माध्यम से भी समझ सकते है जोकि पोस्ट के नीचे आपको मिल जाएगी |

How to Calculate Your Inverter/UPS Battery Backup Time in hindi. Calculate Battery Backup Time How to Calculate Your Inverter/UPS Battery Backup Time in hindi. Calculate Battery Backup Time Reviewed by Joshi Brothers on दिसंबर 30, 2019 Rating: 5

Calculate kw to hp and hp to kw in Hindi |Convert kw to hp and hp to kw|

दिसंबर 23, 2019
अक्सर motor की rating hp/kw में होती है लेकिन कुछ लोग जब किसी motor की rating hp/kw में देखते हैं  जो वो कंफ्यूज हो जाते है की hp को kw में कैसे बदला जाए ? या kw को hp में कैसे बदला जाए ? ये पोस्ट उन सभी दोस्तों के लिए है जो जानना चाहते हैं  कि  कैसे hp को kw में और kw को hp में बदला जाता है, इस पोस्ट में हम विस्तार  में बात करेंगे Calculate kw to hp and hp to kw in Hindi, |Convert kw to hp and hp to kw| के topic पर| hp को kw में और kw को hp में बदलने के लिए आपको दो बातों का पता होना बहुत जरुरी है। पहला तो ये की 1 hp में 746 watt होते हैं, और दूसरा 1 kw में 1000 watt होते हैं अगर आप हमारी सभी latest पोस्ट का update पाना चाहते हो , तो आप हमको Instagram पर Follow कर सकते हैं , क्योकि सभी latest पोस्ट हम Instagram पर update करते रहते है | तो चलिए देखते है अब की, hp को kw में और kw को hp में कैसे बदलते है ?

hp को kw में कैसे बदलते है ? Convert hp to kw.


जैसा की हमने जाना की 1 kw में 1000 watt होते है और 1 hp में 746 watt होते है, अगर आपके पास कोई ऐसी motor है जिसकी rating hp में है और आपको उसे kw में बदलना है तो सबसे पहले आपको hp को watt में बदलना होगा, जैसे की 1 hp है तो 1 * 746 = 746 watt इसी प्रकार 2 hp की motor हो तो 2 * 746 = 1492 watt. अब हम जानते हैं  की 1 kw में 1000 watt होते है तो हमको अब अगर 1 hp को kw में बदलना है तो हम 746 को 1000 से भाग दे देंगे, भाग देने पर हमको जो संख्या मिलेगी वो kw होगी| जैसे 746 / 1000 = 0.746 kw ठीक इसी प्रकार अगर हमको 2 hp को kw में बदलना है तो हम 1492 को 1000 से भाग दे देंगे जैसे की 1492 / 1000 = 1.492 kw इस प्रकार से हम hp को आसानी से kw में बदलते है|


KW को HP में कैसे बदलते है ? Convert KW to HP.

अब हम जान चुके है की 1 kw में 1000 watt होते है और 1 hp में 746 watt होते है, अब अगर आप किसी kw को hp में बदलना चलते है तो आपको सबसे पहले kw को watt में बदलना होगा जैसे की 1 * 1000 = 1000 watt इसी प्रकार 2 kw हो तो 2 * 1000 = 2000 watt, kw को watt में बदलने के बाद अब हम इस watt को 746 से भाग दे देंगे जैसे की 1000 / 746 = 1.34 hp, ठीक इसी प्रकार से 2 kw हो तो 2000 / 746 = 2.68 hp. इस प्रकार से आप किसी भी kw को बड़ी ही आसानी से hp में बदल सकते हो|


दोस्तों हम उम्मीद करते हैं कि आपको दी गई जानकारी पसंद आई होगी और अगर आपका भी ये doubt था तो वो अब खत्म हो गया होगा, आपको ये पोस्ट कैसी लगी कृपया  हमको नीचे  comment करके जरुर बताए|

Calculate kw to hp and hp to kw in Hindi |Convert kw to hp and hp to kw| Calculate kw to hp and hp to kw in Hindi |Convert kw to hp and hp to kw| Reviewed by Joshi Brothers on दिसंबर 23, 2019 Rating: 5

Series Testing Board Connection and Working in Hindi, Full Explanation about series testing board

दिसंबर 04, 2019
आपने कभी ना कभी series testing board का इस्तेमाल जरुर किया होगा, किसी motor की winding को चेक करने के लिए या फिर किसी दूसरे  circuit को चेक करने के लिए| इस पोस्ट में हम series testing board बनाना सीखेंगे  और ये भी जानेंगे कि  series testing board कैसे कम करता है ? अगर आप हमारी सभी latest पोस्ट का update पाना चाहते हैं , तो आप हमको Instagram पर Follow कर सकते हैं , क्योकि सभी latest पोस्ट हम Instagram पर update करते रहते हैं | तो चलिए समझ लेते है:-

Series testing board in hindi
Series Testing Board

6A and 16A Switch Connection.


series testing board को समझने से पहले हम ये जान लेते हैं कि  हम किसी भी electrical load को कैसे 220V के साथ में Switch की मदद से control करते है ?
देखए किसी भी ac load को चालू करने के लिए हमको 220V की जरुरत होती है , जिसमे की 2 wire होते हैं, phase wire और neutral wire. अब मान के चलते हैं  की हमारे पास एक 100W का Bulb है, अब जब तक हम उस blub को phase wire और neutral wire दोनों के साथ नही जोड़ देते तब तक ये bulb on नही होगा और जैसे ही हम phase wire और neutral wire को इस bulb के साथ में जोड़ देते है तो bulb on हो जाता है| हमारे घरो में अगर हमको अपने room की लाइट on करनी होती है तो हम switch को on करते है और हमारी light on हो जाती है| अब यहाँ पर switch की मदद से लाइट को control किया जाता है, जैसा की नीचे diagram में दिखाया गया है| अगर हमको किसी भी bulb का connection करना  है तो हम सबसे पहले अपनी phase wire और neutral wire में से neutral wire को सीधे ही bulb के साथ में जोड़ देते हैं , अब बचता है phase wire, इसको हम एक switch की मदद से bulb को दते है| switch हमेसा series में लगाया जाता है और इससे हमेसा phase wire को ही control करना चाहिए|

Series Testing Board Connection and Working in Hindi
Switch and Bulb Connection

6A and 16A Socket Connection.


अब हम बात करते हैं  socket के connection की तो देखिए, जिस प्रकार से हमने एक switch से bulb को control किया था ठीक उसी प्रकार से हम एक switch की मदद से socket को भी control करते हैं | socket में आपको तीन टर्मिनल देखने को मिलेंगे, जो टर्मिनल सबसे बड़ा और सबसे ऊपर की तरफ होता है उसमें earth wire को जोड़ा जाता है और बाकी के नीचे  जो दो टर्मिनल होते हैं  उनमें हम एक में neutral wire और दूसरे में phase wire को जोड़ा जाता है| Neutral wire  को socket में सीधे ही जोड़ दिया जाता है, जैसा की नीचे  आपको diagram में दिखाया गया है और phase wire को  switch  कीमदद से socket को दिया जाता है| socket में भी हम switch की मदद से phase wire को ही control करते हैं | 

Series Testing Board Connection and Working in Hindi
Socket and Switch Connection

Series Testing Board Connection and Working. (सीरीज टेस्टिंग बोर्ड के कनेक्शन)


अब तक हमने सीख  लिया की किस प्रकार से हम switch की मदद से किसी भी load को control कर सकते है और कैसे हम socket के connection करते हैं  ? series testing board को बनाने के लिए हमको एक bulb और holder, एक switch, एक socket और एक switch and socket base की जरुरत होती है| जैसा की हमने ऊपर जाना की हम किसी भी load के connection करते समय neutral wire को सीधे ही सर्किट के साथ जोड़ देते हैं , तो ठीक उसी प्रकार से हम यहाँ भी bulb holder के साथ neutral wire को जोड़ देंगे और phase wire को हम switch और socket की मदद से व दिए गए diagram की मदद से connect कर देंगे| series testing board में हम switch और socket को series में लगा देते हैं , ऐसा करने से bulb तब तक चालू नही होगा जब तक हम socket के दोनों टर्मिनल्स को आपस में शोर्ट ना कर दें| अब बात आती है की series testing board को कहाँ पर इस्तेमाल किया जाता है ? series testing board की मदद से हम किसी भी electrical fault को check कर सकते है,  motor या fan की winding को चेक करने के लिए| motor winderसिरीज़ टेस्टिंग बोर्ड का इस्तेमाल करते हैं ।

तो दोस्तों ये था series testing board का connection और इसकी working. आपको ये पोस्ट कैसे लगी हमको नीचे comment box में जरुर बताए और अगर आप इस topic को और भी अच्छे तरीके से विडियो के माध्यम से देखना चाहते है तो आप Learn EEE के YouTube channel पर देख सकते है, या फिर इस पोस्ट के निचे जो विडियो है उसको देख सकते है, आपके जो भी doubt होंगे वो सभी clear हो जाएँगे|

Series Testing Board Connection and Working in Hindi, Full Explanation about series testing board Series Testing Board Connection and Working in Hindi, Full Explanation about series testing board Reviewed by Joshi Brothers on दिसंबर 04, 2019 Rating: 5

Servo Motor - Working, Construction, Types, Uses and Controller in Hindi. Servo and Servo Mechanism

नवंबर 11, 2019
इस पोस्ट को पढने के बाद आपको सर्वो motor के बारे में सभी महत्वपूर्ण जानकारी मिल जाएंगी, आप इस topic को विडियो को मध्यम से भी समझ सकते हैं जिसको हमने Learn EEE के youtube channel पर upload किया हुआ है | जैसा की आपको पता होगा की हमारी सभी motors Electrical Energy को Mechanical Energy में बदलती है, ठीक इसी प्रकार से Servo motor भी काम करती है| Servo Motor special purpose motor है जिसको सिर्फ special purpose के लिए ही इस्तेमाल किया जाता है, जैसा की आपने भी देखा होगा की हर जगह इस्तेमाल नही किया जाता है, तो फिर सवाल ये आता है की servo motor को कहा और क्यों इस्तेमाल किया है और servo motor ही क्यों इस्तेमाल की जाती है ? Toys, cnc machines, vmc machines, robotics और हर वो जगह जहां पर हमको अपने object को specific angle पर घुमाना हो या जहां पर हमको high starting torque चाहिए और high accuracy चाहिए वहाँ पर हम servo motor को इस्तेमाल करते है| जिस प्रकार से induction motor की rating HP या KW में होती है ठीक उसी प्रकार  से servo motor की rating KG/CM में होती है| अगर आप हमारी सभी latest पोस्ट का update पाना चाहते है, तो आप हमको Instagram पर Follow कर सकते है, क्योकि सभी latest पोस्ट हम Instagram पर update करते रहते है |

Top 5 automatic room heater for new born baby in india


Servo Motor - Working, Construction, Types, Uses and Controller in Hindi. Servo and Servo Mechanism
Servo Motor

What is the difference between a Servo Motor and an Induction Motor ?


Servo Motor और Induction Motor को जो चीज अलग करती है वो है इनका control system, servo motor closed loop control system पर काम करती है जिसको हम feedback system भी कहते है लेकिन induction motor open loop control system पर काम करने वाली motors है| induction motors का starting torque servo motors के मुकाबले बहुत कम होता है, induction motors की speed control, temperature control, breaking servo motor के मुकाबले काफी जटिल होती है जबकि हम servo motor की किसी भी angle में घुमा सकते है जैसे की अगर कही पर हमको सिर्फ 180 degree का ही rotation चाहिए तो हम servo motor की मदद से इसे भी प्राप्त कर सकते है लेकिन induction motors में ऐसा नही किया जा सकता |

servo motor का Construction कैसा है ?


जैसा की हमने जाना की servo motor closed loop control system पर काम करने वाली motor है जैसा की नीचे  block diagram में दिखाया गया है-
Servo Motor - Working, Construction, Types, Uses and Controller in Hindi. Servo and Servo Mechanism
servo motor block diagram


servo motor दो प्रकार के होती है AC servo motor और DC servo motor, servo motor का construction बाकी की motors से थोडा अलग होता है, servo motor में इस्तेमाल होने वाले पार्ट्स है-
  • motor.
  • Controller.
  • Reduction Gear.
  • Encoder/Potentiometer.
Reduction Gear:- एक आम motor की तरह ही servo motor में भी stator और rotor होते है लेकिन servo motor में rotor shaft के साथ ही एक reduction gear लगा होता है जिसकी वजह से इस motor का starting torque बाकी motors की तुलना में बहुत ज्यादा होता है|

Controller:- इस motor को control करने के लिए एक controller इस्तेमाल किया जाता है जो dc servo motors में microcontroller या arduino हो सकता है और ac servo motor में servo drive होती है| ac servo motor का operating voltage उस motor के manufacturer के ऊपर निर्भर करता है की motor की company कैसी  है, जैसे की fanuc का control system 3 phase 220V पर काम करता है इसमें एक PSM (Power Supply Module) लगा होता है जोकि 3 phase ac supply को 280V के आस पास dc supply में बदलकर servo drive को देता है और फिर servo drive इस dc supply को 3 phase ac supply में बदलकर servo motor को U V W देती है| नीचे  image में fanuc की servo drive को servo motor के साथ connect करके दिखाया गया है|
Servo Motor - Working, Construction, Types, Uses and Controller in Hindi. Servo and Servo Mechanism
Servo Motor with Controller (Servo Drive)


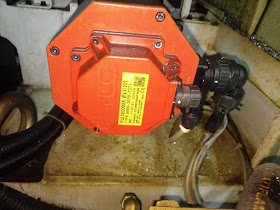
Encoder/Potentiometer:- servo motor में सबसे महत्पूर्ण काम करता है इसका encoder या potentiometer जोकि feedback के लिए इस्तेमाल किया जाता है| dc servo motor में potentiometer और ac servo motor में encoder इस्तेमाल किया जाता है, ac servo motor में encoder motor की rpm, motor का temperature, over torque जैसी जानकारी drive को encoder wire की मदद से feedback देता है| नीचे दी गई image में आपको servo motor के साथ encoder लगा हुआ  दिखाया गया है, इस image में जहां पर specification लिखी हुई  है वो encoder ही है जिसमें उसका model number और serial number जैसी और भी कई जानकारी लिखी गयी है|       

Servo Motor - Working, Construction, Types, Uses and Controller in Hindi. Servo and Servo Mechanism
Encoder for Servo Motor

Servo Motor कैसे काम करती है ?

Servo motor, servo mechanism पर काम करती है जैसा की हम ऊपर servo motor के सभी पार्ट्स के बारे में जान चुके है और हमको पता लग चुका  है की servo motor एक closed loop control system या feedback system पर काम करता है, जब हम servo motor के controller को servo motor को चालू करने की command देते हैं  तो controller उस command को चेक करके motor को supply के साथ जोड़ देता है और motor चालू हो जाती है, motor के rotor के साथ ही एक reduction gear box लगा होता है ये motor के अंदर ही होता है हमको बाहर से नही दिखता | gear box का काम motor का starting torque high करना होता है, gear box की shaft के साथ ही encoder भी लगा होता है जो motor की RPM का feedback controller को देता है जिसकी वजह से motor उतनी ही RPM पर चलती है जितना की controller को command दी जाती है या सिर्फ उसी angle पर rotate करती है जिस angle की command controller को दी जाती है| ,नीचे दिए गए closed loop control system के block diagram को ध्यान से देखिए-
Servo Motor - Working, Construction, Types, Uses and Controller in Hindi. Servo and Servo Mechanism
Closed Loop Control System for Servo Motor


हम उम्मीद करते हैं  की आपको ये पोस्ट पढने के बाद servo motor के बारे में पूरी जानकारी मिल गई होगी फिर भी अगर आपके इस topic से related कोई doubt है तो आप नीचे  comment box में लिख सकते हैं  हम कोशिश  करेंगे की आपके सभी doubt clear करें या आप विडियो के माध्यम से भी इस topic को समझ सकते है आपको  विडियो   पोस्ट के आखिरी  में मिल जाएंगी| 

Servo Motor - Working, Construction, Types, Uses and Controller in Hindi. Servo and Servo Mechanism Servo Motor - Working, Construction, Types, Uses and Controller in Hindi. Servo and Servo Mechanism Reviewed by Joshi Brothers on नवंबर 11, 2019 Rating: 5

How to Use a BreadBoard in Hindi, BreadBoard Connections ब्रेडबोर्ड कैसे इस्तेमाल करते है ?

अक्तूबर 29, 2019
इस पोस्ट में आपको BreadBoard के बारे में जानने को मिलेगा की, BreadBoard क्या होता है ? क्यों इस्तेमाल किया जाता  है ? और इसके connection किस प्रकार किए जाते है ? इन सभी प्रश्नों के जवाब आपको इस पोस्ट को पूरी पढने के बाद मिल जायेंगे | इस पोस्ट के लास्ट में आप BreadBoard को विडियो के माध्यम से भी समझ सकते है, तो चलिए जानते है | अगर आप हमारी सभी latest पोस्ट का update पाना चाहते है, तो आप हमको Instagram पर Follow कर सकते है, क्योकि सभी latest पोस्ट हम Instagram पर update करते रहते है |

know all about breadboard in hindi
BreadBoard

BreadBoard क्या है और क्यों इस्तेमाल किया जाता है ?


अक्सर हम जब भी कोई Electronics Circuit को बनाते है तो सबसे पहले उस circuit का Diagram बनाते है और फिर उस Circuit को Plane PCB या फिर Printed PCB पर बनाते है, लेकिन कई बार हमारे द्वारा बनाया गया Circuit किसी वजह से काम नही करता या हमको PCB मे Soldering किए गए सभी Components को निकालना पड़ता है और फिर दोबारा से Circuit को Design करना पड़ता है | इस Process को इस्तेमाल करने से हमारा समय और पैसे दोनों ही बर्बाद होते है, क्योकि जरुरी नही की जिस Circuit को हम बना रहे है वो पहली ही बार में सही से काम करने लग जाए और अगर काम नही करेगा तो हमारी पूरी मेहनत खराब हो जाती है और PCB भी बेकार हो जाती है, इस सब से बचने के लिए हम BreadBoard का इस्तेमाल करते है, जब भी हमको कोई Circuit बनाना होता है तो हम सबसे पहले उस Circuit को BreadBoard पर बना के चेक कर लेते है, की क्या ये हमारे द्वारा बनाया गया Circuit सही से काम करेगा या नही ? अगर BreadBoard में बने Circuit में कोइ खराबी आती भी है तो हम उसी समय उस Circuit को बिना किसी ज्यादा पैसे और समय खर्च किए सही कर सकते है और जब हमारा Circuit पूरी तरह से सही बन जाए तब हम उस Circuit के लिए PCB Design कर सकते है |


BreadBoard में connection कैसे किए जाते है ?


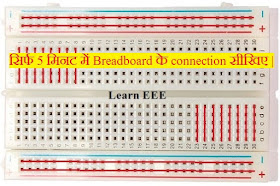
अब आप सोच रहे होंगे की BreadBoard के connection किस प्रकार किए जाते है ? तो ये बहुत ही आसान है, सबसे पहले तो आप नीचे दिए गए BreadBoard को ध्यान से देखिये  और इसको समझने की कोशिश  कीजिये  -


breadboard connection in hindi
BreadBoard


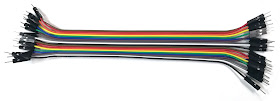
जो आपको ये Image दिख रही है इसको हम BreadBoard बोलते है, इसमें आपको बहुत सारे होल दिख रहे होंगे इन होलो में हम Electronics Components को लगते है और एक Component को दूसरे  Component से jumper wire की मदद से जोड़ते है | निचे दिखाई गई फोटो jumper wire की है:-

jumper wires connection in hindi
Male Jumper Wires

इन jumper wire की मदद से ही BreadBoard में एक component को दूसरे component से जोड़ा जाता है, इस BreadBoard में आपको Positive और Negative के दो Symbol दिख रहे होंगे, BreadBoard में ऊपर और नीचे positive और negative वाली लाइन में Power Supply कनेक्ट होती है, आप चाहे तो ऊपर की तरफ जोड़ सकते है या फिर नीचे  की तरफ जोड़ सकते है, positive और negative वाली पूरी row एक दूसरे से internally connect होते हैं  और उसके ऊपर BreadBoard में जो आपको 1, 2, 3...... 30 नंबर दिखाई दे रहे होंगे, इसके column एक दुसरे से internally connect होते है जैसा की नीचे  दिए image में दिखाई दे रहा है:-

breadboard connection with jumper wires
Breadboard Connection


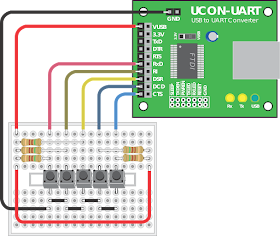
इस इमेज में हमने सर्फ कुछ ही columns को एक दुसरे से connected दिखाया  है लेकिन ये BreadBoard में 1 नंबर से 30 नंबर तक सभी columns internally connect होते है और ये ऊपर और नीचे  दोनों तरफ के columns connect होते है लेकिन ऊपर और नीचे  वाले columns और row एक दूसरे  से नही जुड़े होते बीच  में थोड़ी सी जगह खाली  रहती है जहाँ पर आपको Learn EEE लिखा  दिख रहा होगा | नीचे  दी गई Image को देख के आप समझ सकते है की किस तरह से BreadBoard में Components को लगाया जाता है |

breadboard connection with jumper wire in hindi
Breadboard Connection with Arduino


जैसा की इस Image में दिख रहा होगा की PCB और BreadBoard को jumper Wires की मदद से एक दूसरे से connect किया गया है |

तो दोस्तों  ये है BreadBoard की पूरी जानकारी अगर आपने ये पोस्ट पूरी पढ़ी है तो मुझे पूरी उम्मीद है की अब तक तो आप समझ ही गए होंगे की BreadBoard क्या होता है और BreadBoard में connection किस प्रकार से किए जाते है, फिर भी आपके BreadBoard को लेकर  कोई doubt रह गए या अगर आपको समझ में नही आया तो आप इस पोस्ट के नीचे  comment box में अपना जो भी doubt हो उसको लिख सकते है, हम आपके सभो comments का reply करने की पूरी कोशिश करेंगे | BreadBoard के ऊपर हमने Learn EEE channel पर विडियो भी बना रखी है, आप चाहें तो आप उस विडियो को भी देख सकते है |


How to Use a BreadBoard in Hindi, BreadBoard Connections ब्रेडबोर्ड कैसे इस्तेमाल करते है ? How to Use a BreadBoard in Hindi, BreadBoard Connections ब्रेडबोर्ड कैसे इस्तेमाल करते है ? Reviewed by Joshi Brothers on अक्तूबर 29, 2019 Rating: 5

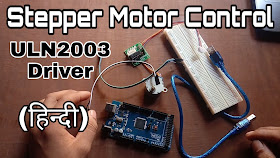
How to Control a Stepper Motor with Driver and Arduino in Hindi, Stepper Motor Testing

अक्तूबर 21, 2019
आज के समय में Industries के अंदर Automation बहुत ज्यादा बड गया है, अब लगभग सभी Industries Automation की तरफ बड रही है, जब भी Automation की बात होती है, तो इसमें  Robots को सबसे ज्यादा इस्तेमाल किया जाता हैं, Automobile Sector हो या कोई और हर जगह robots का इस्तेमाल बड गया है | अगर बात Automation और Robots की होती है तो Stepper Motor एक ऐसी मोटर है जिसके बारे में जरुर बात की जाती है, क्योकि आज के समय में बिना stepper motors के robots को नही बनाया जा सकता | इस पोस्ट में हम stepper motor को किस प्रकार से control किया जाता है इसपर बात करेंगे| अगर आप हमारी सभी latest पोस्ट का update पाना चाहते है, तो आप हमको Instagram पर Follow कर सकते है, क्योकि सभी latest पोस्ट हम Instagram पर update करते रहते है |

How to Control a Stepper Motor with Driver and Arduino in Hindi
Stepper Motor Testing


जैसा की बाकि normal motors को हम सीधे ही supply voltage के साथ जोड़ देते हैं और motor से output ले लेते हैं लेकिन stepper motor को सीधे ही supply voltage के साथ में नही जोड़ा जाता, इसको supply voltage इसके Driver की मदद से दी जाती है जोकि एक Microprocessor  होता है | stepper motor एक special machine या advanced machine होती है जिसको सिर्फ special purpose के लिए ही इस्तेमाल किया जाता है|

यहाँ पर हम एक stepper motor को Arduino Mega 2560 और ULN2003 की मदद से control करने वाले हैं | ULN2003 किट आप चाहें तो ऑनलाइन खरीद सकते हैं  या इस किट को आप खुद बना भी सकते हैं हमने यहाँ पर इस किट को JLCPCB (Prototype PCBs for Only 2$) की PCBs का इस्तेमाल करके खुद बनाया है|

How to Control a Stepper Motor with Driver and Arduino in Hindi

Stepper Motor को control करने के लिए हमको कुछ Hardwares की जरुरत पड़ेगी जोकि नीचे  दिए गए है-MEGA 2560 *1
USB Cable*1
Deceleration Stepper Motor*1
ULN2003*1
Dupont Wire*Several

Arduino और ULN2003 के connection किस प्रकार से करने है वो हमने LearnEEE की विडियो में detail में बताया है, आप वहां से इसके connection देख सकते हैं और किसी भी stepper motor को control कर सकते है |


How to Control a Stepper Motor with Driver and Arduino in Hindi, Stepper Motor Testing How to Control a Stepper Motor with Driver and Arduino in Hindi, Stepper Motor Testing Reviewed by Joshi Brothers on अक्तूबर 21, 2019 Rating: 5

How to Make Traffic Light with Arduino Program in Hindi. Traffic Light Connection and Program in Hindi

अक्तूबर 14, 2019

दोस्तों इस पोस्ट में आपको ट्रैफिक लाइट किस तरीके से काम करती है, और ट्रैफिक लाइट का सर्किट किस प्रकार से बनाया जाता है इसके बारे में जानने को मिलेगा, इस सर्किट को बनाने के लिए हम Arduino का इस्तेमाल करने वाले हैं  जिसमें हम अपना प्रोग्राम डालेंगे और इस सर्किट को बनायेंगे, इस सर्किट को सबसे पहले आप Breadboard पर बना लें उसके बाद आप चाहें तो इस सर्किट को PCB में भी सोल्डरिंग करके बना सकते हैं| इस सर्किट में हम JLCPCB की PCBs इस्तेमाल कर रहे हैं, यहाँ से आप किसी भी Color की  PCBs सिर्फ 2$ में बनवा सकते हो|  तो आइए प्रैक्टिकली सीखते हैं | अगर आप हमारी सभी latest पोस्ट का update पाना चाहते हैं तो आप हमको Instagram पर Follow कर सकते हैं , क्योकि हम सभी latest पोस्ट हम Instagram पर update करते रहते है |


 How to Use a BreadBoard in Hindi, BreadBoard Connections ब्रेडबोर्ड कैसे इस्तेमाल करते है ? 

Traffic Light Circuit (ट्रैफिक लाइट सर्किट)


इस सर्किट को  बनाने के  लिए सबसे ज्यादा जरुरी कॉम्पोनेन्ट Arduino है और बाकी के कंपोनेंट्स नीचे  दिए गए हैं , ये सर्किट किस प्रकार से बनेगा इसके बारे में हमने अपनी विडियो में डिटेल में बताया है, हमारे Youtube Channel पर आप विडियो देख सकते है|

Traffic Light Circuit with Arduino Program in Hindi.
 How to Control a Stepper Motor with Driver and Arduino in Hindi, Stepper Motor Testing 

आइए देखते हैं कि, ट्रैफिक लाइट को बनाने के लिए हमें  किन किन कंपोनेंट्स की जरूरत पड़ने वाली है:-

Hardware Required:-


  1. Red M5 Direct Plug-in LED*1
  2. Yellow M5 Direct Plug-in LED*1
  3. Green M5 Direct Plug-in LED*1
  4. 220Ω Resistance*3
  5. Breadboard*1
  6. Breadboard Jumper Wire*1 bunch

Traffic Light Circuit Program:-


int redled =10; //define digit 10 interface
int yellowled =7; //define digit 7 interface
int greenled =4; //define digit 4 interface
void setup()
{
pinMode(redled, OUTPUT);//define the red light interface as the output interface
pinMode(yellowled, OUTPUT); //define the yellow light interface as the output interface
pinMode(greenled, OUTPUT); //define the green light interface as the output interface
}
void loop()
{
digitalWrite(greenled, HIGH);////turn on green light
delay(5000);//delay 5 seconds
digitalWrite(greenled, LOW); //put out green light
for(int i=0;i<3;i++)//flicker for three times, yellow light blinking effect.
{
delay(500);//delay 0.5 second
digitalWrite(yellowled, HIGH);//turn on yellow light
delay(500);//delay 0.5 second
digitalWrite(yellowled, LOW);//put out yellow light
}
delay(500);//delay 0.5 second
digitalWrite(redled, HIGH);//turn on red light
delay(5000);//delay 0.5 second
digitalWrite(redled, LOW);//put out red light
}

How to Make Traffic Light with Arduino Program in Hindi. Traffic Light Connection and Program in Hindi How to Make Traffic Light with Arduino Program in Hindi. Traffic Light Connection and Program in Hindi Reviewed by Joshi Brothers on अक्तूबर 14, 2019 Rating: 5

Relay Working, Construction and Connection in Hindi

सितंबर 08, 2019
इस पोस्ट में हम जानेंगे की 5V, 5 Pin DC Relay Working, Construction and Connection in Hindi, Relay Working and Connection कैसे करते हैं , हम उम्मीद करते हैं कि आपको ये पोस्ट पसंद आएगी और इस पोस्ट से आपको बहुत कुछ सीखने  को भी मिलेगा। अगर आप हमारी सभी latest पोस्ट का update पाना चाहते हैं , तो आप हमें  Instagram पर Follow कर सकते हैं , क्योकि हम  सभी latest पोस्ट  Instagram पर update करते रहते हैं  |

relay working and connection in hindi
Relay Working and Connection

What is Relay ?


Relay एक switching device है जिसको हम external voltage (5V DC, 12V DC, 24V DC, 110V AC, 220V AC या 440V AC) देकर control कर सकते हैं , किस relay को कितना controlling voltage देना है ये relay coil पर निर्भर  करता है और relay को control circuit में इस्तेमाल किया जाता है।  किसी भी relay मे हमें  दो चीजों की जरुरत होती है, पहला है NO (normally open)और दूसरा है NC (normally close), ताकि हम relay का इस्तेमाल अपने control circuit में कर सकें।

relay working principle construction and connection in hindi
Relay Working and Connection in Hindi

Relay Working Principle in Hindi

इस पोस्ट  में हम 5V, 5 Pin DC Relay की बात कर रहे हैं , अगर बात की जाए Relay के Working Principle की तो लभभग सभी Relay का Working Principle एक ही होता है। जैसे की हमने आपको ऊपर बताया की relay coil को control करने के लिए controlling voltage की जरुरत होती है, जैसे ही relay की coil को controlling voltage दी जाती है तो relay की coil में एक magnetic field बनता है, relay coil के साथ ही एक plunger या plate लगा होता है, जब relay coil में magnetic field बनता है तो ये plunger या plate coil की ओर आकर्षित होती है जिससे NO - NC बनता है और NC - NO बन जाता है। 

Relay Construction in Hindi 

जैसा की हमने जाना की relay एक switching device है तो एक relay में NO NC और Com. terminals  होते हैं, जिसमे NO और NC plunger या plate से कनेक्ट होते हैं । relay में एक operating coil भी होती है, जिसमे magnetic field बनता है। relay में NO और NC के Contact इस प्रकार से plunger या plate के साथ जुड़े होते हैं  की जब relay अपनी home position में होती है तो plunger या plate NC terminal को Com. terminal के साथ connect करके रखती है, लेकिन जैसे ही coil magnetise होती है तो यही plunger या plate NO terminal और com. terminal को आपस में कनेक्ट कर देती है जिससे switching होती है। जब relay coil से supply voltage disconnect कर दी  जाती है तो relay फिर से अपनी home position में आ जाती है, supply voltage ना होने पर अपने आप home position आने के लिए इसके plunger या plate में एक spring लगी होती है जो इसको home position में ले कर  आती है। 

Relay Connection in Hindi 

किसी भी relay में connection करने के लिए हमें  तीन terminals की जरुरत होती है जिनमें पहला है common  terminal दूसरा है NC (normally close) और तीसरा है NO (normally open) इन तीनो terminals के अलावा A1 और A2 terminals को coil के terminals होते है जिनको controlling voltage दी जाती है जैसा की ऊपर diagram में दिखाया गया है।

Relay Working Principle, Connection and Construction के बारे में Video से समझने लिए आप नीचे  दी गई Video देख सकते है।


Relay Working, Construction and Connection in Hindi Relay Working, Construction and Connection in Hindi Reviewed by Joshi Brothers on सितंबर 08, 2019 Rating: 5

Schneider Drive Connections in Hindi, Download Schneider AVR12 Series VFD Manual in Hindi.

जुलाई 28, 2019
इस पोस्ट में हम आपको Schneider Drive Connections in Hindi, Download Schneider AVR12 Series VFD Manual in Hindi. के बारे में बताने वाले है, हमने अपने Youtube Channel Learn EEE में आपको Schneider ATV12HO18M2 Model नंबर के बारे में बताया था कि किस प्रकार से हम Schneider ATV12HO18M2 पर काम कर सकते हैं , और इस Drive के connection कर सकते हैं | अगर आप हमारी सभी latest पोस्ट का update पाना चाहते हैं , तो आप हमें  Instagram पर Follow कर सकते हैं , क्योकि सभी latest पोस्ट हम Instagram पर update करते रहते हैं |

schneider vfd connection in hindi
Schneider VFD Connection, Parameters and Manual

PLC (Programmable Logic Control) in Hindi. PLC Working and Connection in Hindi. Full details about PLC in Hindi 

जैसा कि हमने आपको अपनी वीडियो में बताया था की किसी VFD पर काम करने के लिए हमें  उस VFD के Manual की जरुरत पड़ती है, और बिना Manual के हम किसी भी Drive के Connection नहीं कर सकते क्योकि सभी Drives के Connections and Parameters अलग होते हैं | 

अगर आपने अभी तक Learn EEE Channel पर Schneider ATV12HO18M2 के Connection वाली Video नहीं देखी है तो आपको वो Video जरूर देखनी चाहिए, क्योकि उस Video में हमने Schneider ATV12HO18M2 के connection को काफी details में समझाने की कोशिश की है| 

नीचे हमने आपको कुछ VFD के Manuals के Link दिए हुए हैं ,आप उन सभी Manuals को Download कर लें, जिससे की आप सभी VFD पर आसानी से काम कर सकें क्यूंकि सभी Drives का Basic Principle same होता है और Connections भी लगभग एक जैसे ही होते है, लेकिन Parameter सभी Drives के अलग होते हैं  जिसके लिए आपको Drive का Manual Follow करना पड़ता है|

Schneider VFD Manuals...

Schneider ATV12 Programming and Connection Manual
Schneider Altivar 312 Programming and Connection Manual
Schneider Altivar 310 Programming and Connection Manual

Delta VFD Manuals...

Delta VFD-C2000 AC Drives
Delta VFD-CP2000 AC Drives
Delta VFD-EL AC Drives
Delta VFD-E AC Drives
Schneider Drive Connections in Hindi, Download Schneider AVR12 Series VFD Manual in Hindi. Schneider Drive Connections in Hindi, Download Schneider AVR12 Series VFD Manual in Hindi. Reviewed by Joshi Brothers on जुलाई 28, 2019 Rating: 5

Working of NO Push Button, NC Push Button and Emergency Push Button in Hindi. NO and NC Concept in Hindi.

मार्च 30, 2019
जिस प्रकार से हम लोग अपने घरों में light, fan या फिर किसी अन्य लोड को अपने घरों में लगे switches के माध्यम से ON या OFF करते हैं, ठीक उसी प्रकार से Industry में भी Machines को control करने के लिए या फिर Machines की switching करने के लिए हम जिस switches का इस्तेमाल करते हैं  उनको NO Push Button, NC Button and Emergency Push Button कहते हैं| क्या है ये Push Button और कैसे काम करते है चलिए  जानते हैं | अगर आप हमारी सभी latest पोस्ट का update पाना चाहते हैं , तो आप हमें  Instagram पर Follow कर सकते हैं, क्योकि सभी latest पोस्ट हम Instagram पर update करते रहते है |

NO Push Button, Element and Symbol

NC Push Button, Element and Symbol

NO और NC Button कैसे काम करता है ?


NO को Normally Open कहा जाता है, इसका मतलब Circuit Open है, NO Switch और Element को हरे (Green) रंग से दर्शाया जाता है। माना कि हमारे कमरे का पंखा अभी बन्द है इसका मतलब ये है कि पंखे का Switch बन्द है, यानी कि Switch NO Position में है।

NC को Normally Closed कहा जाता है, इसका मतलब है कि Circuit Closed है। NO Switch और Element को लाल (Red) रंग से दर्शाया जाता है। कमरे का जो पंखा बन्द था अगर हम उसको चालू कर देंगे तो उस समय उस पंखे का Switch ON होगा, यानी कि Switch NC Position में होगा।


Emergency Push Button,Element and Symbol
Emergency Push Button, Element and Symbol

Emergency Push Button कैसे काम करता है ?

जब किसी machine के panel की controlling की जाती है तो Controlling के लिए main supply, Emergency Switch से दी जाती है,  यानी कि Controlling में Emergency Switch ही main switch होता है, इसलिए Emergency Switch बन्द करने पर पूरी machine बन्द हो जाती है। इसमें भी NC Element इस्तेमाल किया जाता है।

हम उम्मीद करते हैं आपको ये पोस्ट पसंद आई होगी, फिर भी अगर आपको इस टॉपिक से related कोई भी doubt है तो आप हमें  नीचे comment section में बता सकते हैं , हम कोशिश  करेंगे की हम अपनी अगली पोस्ट में आपके doubt clear कर सकें|


Working of NO Push Button, NC Push Button and Emergency Push Button in Hindi. NO and NC Concept in Hindi. Working of NO Push Button, NC Push Button and Emergency Push Button in Hindi. NO and NC Concept in Hindi. Reviewed by Joshi Brothers on मार्च 30, 2019 Rating: 5
Blogger द्वारा संचालित.